Rustic DIY Blanket Ladder with Dowels

Hey there!

So today I decided to build a farmhouse inspired blanket ladder for our family room, and instead of it becoming a do-it-yourself project is became an ‘assemble-it-yourself’ project! I went out shopping for the wood needed for the project and received the best customer service at Rona (I know, I know, I’m normally a loyal Home Depot gal)! Rona had a ‘workshop’ style cutting centre and the associate there was able to do all my cuts and more. Originally I was going to follow the steps found on Angela Marie’s blog, but ended up going with the suggestions of the very experienced associate instead. Here is what I bought:

Materials List:

  • 2 – 1 inch x 48 inch wood dowels cut to 18.5 inches
  • 2 – 2x3x8 ft spruce cut to 76 inches
  • Minwax Stain in Jacobean and Classic Gray
  • Wood glue
  • 1 inch drill bit or 1 inch spade

The associate suggested that I make 2 angle cuts – one on the top and bottom so that the blanket ladder rests nicely on the wall and he went ahead and did those for me right there, which I was very surprised with because not many places allow for angle cuts. He then noticed that I had purchased a 1 inch spade bit that I was going to use to drill the holes for the dowels (as mentioned in the blog), but said that those can get quite tricky to use and there is a greater chance of injury and messing up, so he offered to take the wood and drill ½ inch deep holes in the wood in the back for me! He used a large 1 inch drill bit to make the holes centered on the 2×3’s. The holes were spaced out at 12 inches apart, leaving about 23 inches from the bottom.

After all the cuts were done and the holes were made, all that was left was for me to go home and glue everything together. I was so happy that he was able to help me out because it saved me so much time. With a quick coat of stain, I was done this project under $30 and in a couple hours. This project could have not been any easier for me, thanks for all your help Rychard!

Blanket ladders are so cute, are you going to make one too? 

Vips


Check out the time-lapse video on my instagram!


Staining 101: The Easiest Way to Make Wood POP!

Hey!

Staining is a simple and easy way to really bring wood to life. There are a ton of different colours and finishes to choose from and all you need is a microfiber cloth to get started. Here are some things to consider when choosing what stain to go with:

1) Type of wood you will be using

The first thing you need to determine is the kind of wood you will be staining. Different species of wood absorb stain differently – hardwoods vs softwoods. Be sure to consider the grain on your wood as darker stains will accentuate them and lighter stains will somewhat conceal them.  

Here is a great blog that shows how the same stain colour looks on different types of wood*

2) Oil-based vs Water-based stains

Depending on your project you will need to look at what base your stain should have. Oil based stains tend to take longer to dry giving you more time to work with it – better for floors and cabinetry. Water based stains, on the other hand, take less time to dry and clean up a lot easier – better for smaller quicker projects.

3) Make sure you have the right equipment

Some projects recommend you use a foam brush to apply the stain and then wipe with a cloth, others you can just dip the microfiber cloth into the stain and apply. Make sure you have plenty of tarps laid out so that you don’t spill stain everywhere. I highly recommend staining your projects outside for ventilation and easier clean up.

4) Final finishes

If you have a smaller project this step is ‘optional’. There are a variety of different finishes that can be applied on top of the stain to seal and protect the wood. From shiny lacquer to a clear matte polyurethane, you can choose to seal the wood with whatever you like.

Now that you got the basics, it’s time to pick the colour. There are hundreds of shade ranges to choose from and be sure to test them out on a piece of wood so that you know what to expect. Don’t be afraid to mix stains!

Here are my favourite stain colours: 

Minwax Jacobean

Minwax Classic Gray

Minwax Provencal

What’s your favourite stain colour?

Vips

6 Things You Should Get Done Before Summer Ends: Home Maintenance Checklist

Hey there!

Now I know what you all might be thinking – you’re not a homeowner, what do you even know about house maintenance? Well for as long as I could remember, cleaning and organization have always been somewhat of a family affair in our house. From spring cleaning to summer gardening, maintaining and continuous upkeep up around the house were activities everyone had to participate in. Maybe it’s an immigrant parent thing? Who knows! What I do know is that as we slowly approach the end of this sunny summer, there are a lot of things that need to be done before sweater weather creeps up.

Here is a simple checklist to help you get your home ready for fall:

1) Clean out your garage and storage rooms

After misplacing my drill charger last week, I was forced to clean out and organize everything in our garage and basement storage room. You would be surprised at how messy these spaces get over the summer – with pool floaties, power tools, bikes and camping supplies, it is time for a huge clean out. August is the perfect time to clean out everything in these room and re-organize your stuff to prepare for the coming fall and winter. I suggest taking a weekend to go through all of your summer junk and pack up what you don’t need. Whenever we clean out our garage we usually give the floors a good power wash as well.

2) Freshen up with a coat of paint

Nobody likes painting in the cooler months, so as summer winds down, now is the time to freshen up your home with a coat of paint. For less than $40 for a can of paint, this is an inexpensive way to give your home a clean new look. Painting your exterior finishes like garage doors and window sills will help seal any cracks and preserve your wood to survive the winter. Depending on how much time you have, you can even stain your deck or fence to brighten up your property.

3) Wash those dirty windows

Not everyone thinks to clean their windows, but while the weather is still bright and sunny, now is the best time to do it! Grab a power washer and spray down all your windows to get rid of any dirt that has been built up all summer. Take this time to also reseal your window frames with silicone caulking and wash your screens.

4) Closet clean out and reorganization

As the weather starts to get cooler you’ll notice clothes getting longer, so now is the perfect time to start packing up your summer shorts and pulling out some sweaters. Go through each closet and get rid of any clothes you don’t wear anymore (donate them to your local charity if you can!) and make some space to transition into fall and winter clothes. Add some shelves or use storage containers to keep things organized.

5) Replace your air filters

With your A/C running all summer, it’s definitely time to replace those filters in your home. If you don’t have any already at home, you can grab them from your local hardware store. This is relatively inexpensive but will make a huge difference on the air quality in your home.

6) Pack up your outdoor furniture

Give your outdoor furniture and accessories a wash and start packing up what you don’t need. It is easy to forget about cleaning your outdoor living items, but this is something you can do closer to September. Hose down your patio sets and clean any gazebo netting to remove dust and bugs. Take time to look around your yard and put away anything you don’t want left outside during the fall.

With only a couple weekends left of August, these are just a few things you can do to wrap up a great summer!

Cheers,

Vips

Creating an Eye-Catching Focal Piece for Your Kitchen: DIY Backsplash Accent Wall

Hey there! 

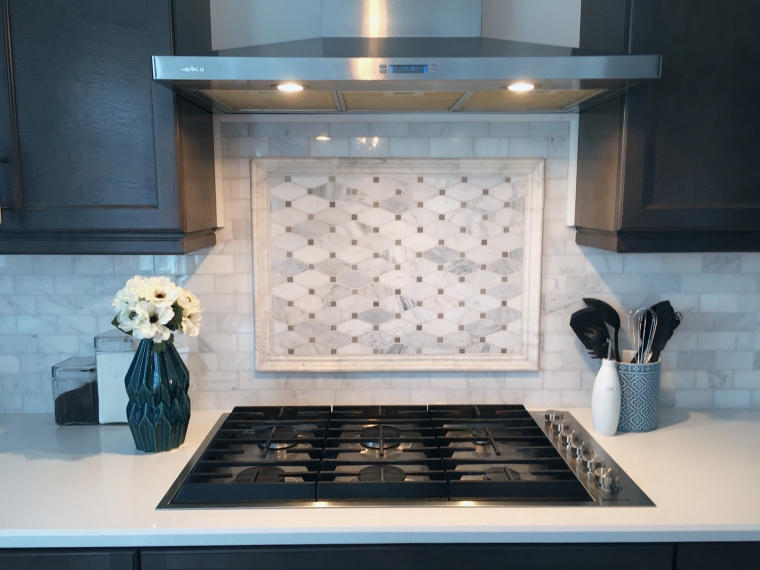
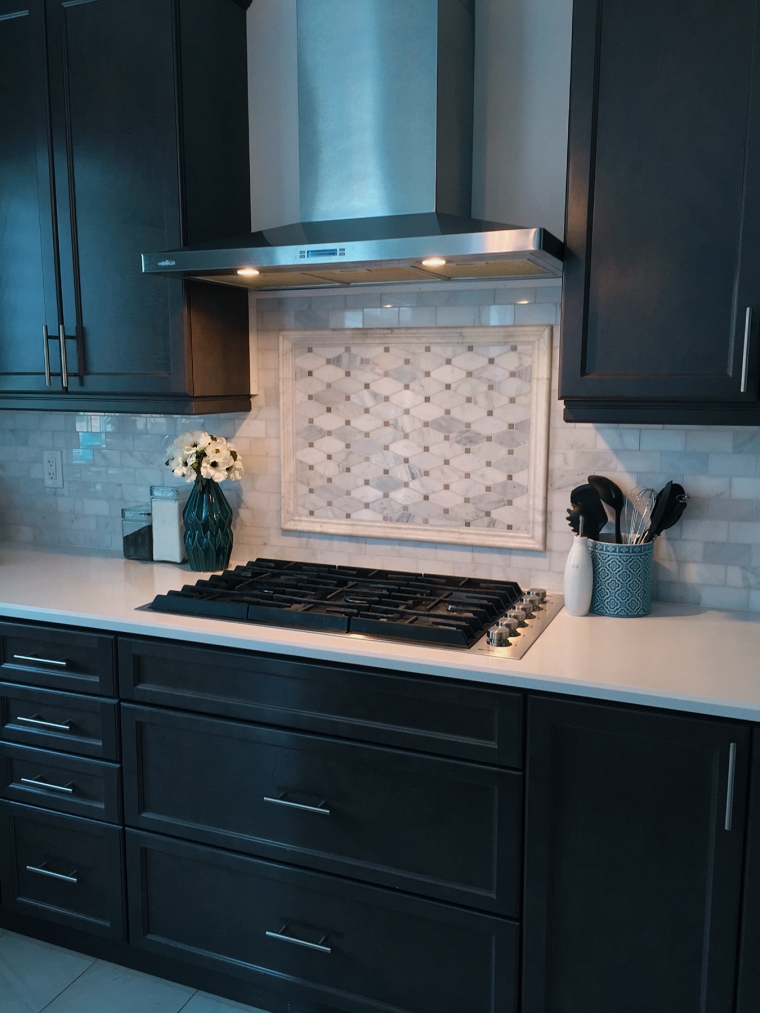
This one was long overdue! For those of you who have followed me on Instagram, you have seen the countless days I was working away on my moms extravagant marble kitchen backsplash. Having been my second tiling project (first being the easy peasy laundry room backsplash), this one was way more challenging and very time consuming. Here I will go through how I tiled the beautiful accent piece that went above the gas stove.

IMG_0641

Before you start: Pick your tiles!

This was probably just as time consuming as the project itself. Finding the right tile to compliment your kitchen takes time and patience. We have warm gray maple cabinets and bright white quartz countertops with white marble floor tile – which started to look a bit too sterile for my liking. I decided to go with a beautiful white and gray Calcutta marble subway tile that picked up all the shades we had in our kitchen. As for the accent piece, I wanted something that wasn’t too trendy or flashy, so we picked a white and gray elongated geometric pattern.

If you are having trouble deciding be sure to ask for a sample and see how the colours and shapes look like in your space because depending on the lighting it will look very different than it does in the showroom. I bought all the tiles (with the exception of the chair rail border) from Moscone Tile in Vaughan – and they are absolutely AMAZING (s/o to Katherine!). There prices were competitive and there selection was simple outstanding!

STEP 1: Measure out your accent piece

The next thing you need to do is figure out roughly how large you want your accent piece to be. I decided I wanted about 4 inches around the sides and 2 tile lengths from the top and then drew out a rough idea of where I was going to tile. Make sure you use a level!

What I wish I knew before: START this section before you tile the rest of the kitchen!! I did it the other way around and left the accent section till the very end and some of the tiles did not line up completely in the center (I can live with it, but if you more picky then make sure you do this!). Starting from this accent piece and working your way out will ensure the feature will be centered and easy on the eyes. Luckily my tiles and grout colours were similar so it is hardly noticeable. 

Note: I referred to this video here to help me visualize how to tile my accent piece, take a look!

STEP 2: Cut and measure out your tiles

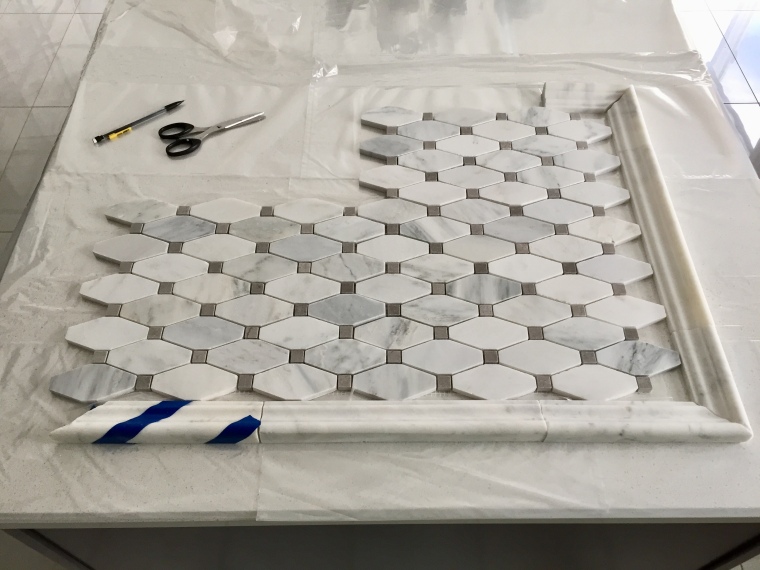
Once you have a rough idea of how large your section is going to be, cut the center tiles so that they fit the size of the square you drew on the wall. Then if your using border pieces (I used marble chair rails found here), cut those on an angle and line everything up. Once everything looked like it fit, it’s time to start tiling.

I laid everything out like this:

IMG_5699

STEP 3: Seal and grout

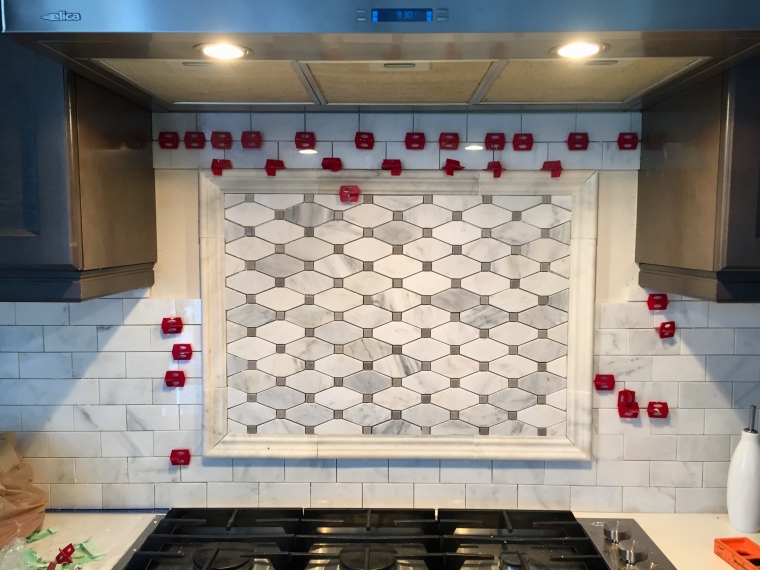
This part will require a helping hand or two. Depending on your pieces, you may need one person to add the adhesive to the wall and then one person sticking the tile sheets to the wall. Start with your bottom border pieces first and work your way up. The marble was heavy and I needed LOTS of spacers to make sure everything lined up.

IMG_5711

Take your time on this step and make adjustments as your go – as long the adhesive isn’t dry you will have a bit of wiggle room. Then all you need to do next is seal your tiles (if you have natural stone) and grout.

IMG_0640

And, voila! I am done! Saved myself over $800 in labour alone by doing this project myself, which is a win in my books.

So what do ya’ll think? Let me know!

Vips

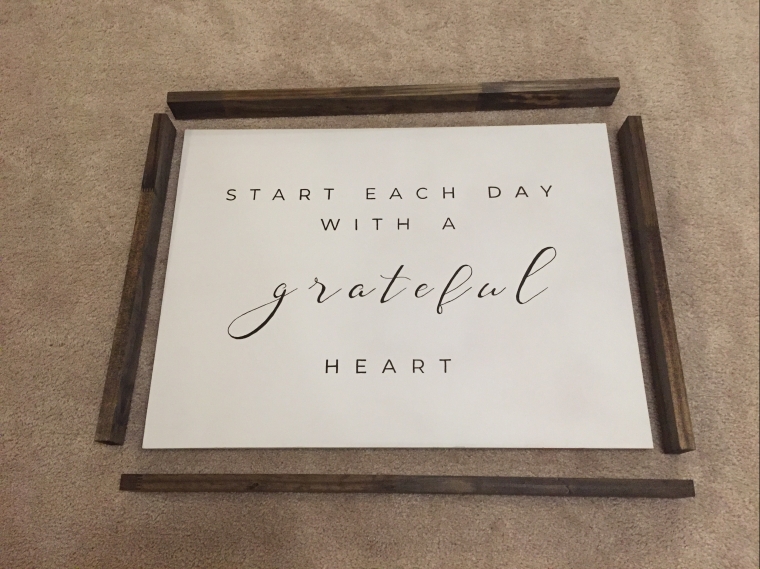
Rustic Farmhouse Inspired Wood Sign

Hey hey!

Time for another do-it-yourself project! I was debating what I should do in the master ensuite after I finished the bathroom nook, and was tossing up ideas on either hanging shelves or a sign. I figured that I could do without more shelving and maybe should hang a cute sign that was large enough to fill up the space above the toilet.

I actually was on Pinterest when I came across this particular saying and with everything that’s been happening this year, this was a great daily reminder to stay positive. After I was quoted over $60 from a local ‘artisan’ – which to me sounded a tad ridiculous – I knew that this was something I could easily do in a few hours.

IMG_0562

With some scrap plywood laying around, I was able to finish this project in HALF the price I was quoted. So if you want to make a similar sign here is what you’ll need:

Materials List:  IMG_0533

  • ⅜ plywood (mine was cut to 24×18 inches)
  • 1×2 pine for framing
  • White ‘chalk’ spray paint
  • Minwax Stain in Jacobean (a very popular colour!)
  • Sharpies (fine and ultra fine)
  • Mending plates
  • Picture hanging kit
  • Screws

STEP 1: CUT & PAINT

First step is to get your plywood and the 1×2 pine cut to size so that it can frame the board. You can either make these cuts at home or at the hardware store that you buy your material from. Next you are going to paint the plywood whatever colour you like and stain the framing pieces. Let everything dry for a few hours before moving on.

STEP 2: TRACE YOUR QUOTE

Once you figure out what you want your sign to say, draft this on Adobe Illustrator or even Word. You want the letters to be large enough to fit your sign and you can even experiment with cool fonts like this.

Since I didn’t have tracing paper, I actually followed these steps posted by Angela and it was super easy. 

img_0546.jpg

STEP 3: FRAMING & HANGING THE SIGN

When you are done tracing and outlining your saying in sharpie (or paint), you will now need to frame the edges with the 1×2 pieces. I held the pieces around the board and nailed them into place (if you have a brad nailer it will be even easier). My particular pieces were not as tight as I would’ve liked and the board was able to slip out, so I purchased mending plates to secure the board and framing together on the back. Finally, once your pieces are secure, you can add picture hanging hooks or wire and have it ready to go.

IMG_0548


Overall, this was a simple project that ANYONE could do even if you don’t own any power tools. For under $30 bucks and something that can be done in less than a day, it is definitely a simple project you can complete to easily decorate any space.

I love the way it turned out and I am very tempted to make another sign! If you are inspired to make your own sign, be sure to tag me in it!


Can’t wait to see,

Vips


If you have a stencil maker check this video out:

So like… why are you blogging?

If you already know me then you probably know that I’ve always been somewhat of a crafty and creative person. Whether it be make up, cooking, or building, I am always trying to learn new skills. I like to think that I know a little bit about a lot.

“jack of all trades, master of none”

This was a saying that a stranger I once met years ago said to me and it really stuck. However, I can’t help but think that a lot of people might view this as a bad thing? For me, it’s not about becoming the best, it’s about learning new ways to do things and finding different outlets to display my creativity.

That’s when I decided that a DIY focused blog would be the best topic for me. I want a place to share my experience on projects I already do and enjoy doing. It was an easy topic for me to get started and I know there is a few people who are curious to see what I am always up to – so why not blog about it?

Though I’ve never been a hugely ‘obsessed’ social media person before, I have come to realize how important your presence actually is online. With everything becoming so digital, it only makes sense to find a way to develop both your personal brand and your unique portfolio – all online. This is how I really came about starting this blog. *Well technically it is because I had to make one for my social media class, BUT I realized that I could either make something that I’m just OK with it, or I can put in some real hard work and create something I am genuinely proud of.

Now, I don’t really know where this blog is going to take me, but I am excited to see how it goes! This is a weird journey for me as an introverted extrovert, but hey, at least some of you will be along for the ride!


-Vips


I would love to get some suggestions on what content you want to see, let me know in the comments!